IJ Scan Utility

By clicking the download button and installing Driver Updater (4.5 MB, free trial, $39.95/yr to access the full version), I acknowledge I have read and agree to the End User License Agreement and Privacy Policy of this site. Uninstall instructions.
“ Disclaimer – The information available at istartsetup.com is subject to change. The content on this page is similar to other websites that provide the latest information on technical error. Therefore, istartsetup.com is an independent third-party service provider aiming to solve all technical issues/errors related to printers/softwares. We provides an installation guide to activate different types of softwares , We also use trademarks, logos, images, and products only for informational purposes. The data present on istartsetup.com can be changed without any prior information in relevance with the updates.”
IJ Scan Utility - Download, Install and Run the Canon IJ Scan Utility
IJ Scan Utility is software for your Windows and Mac operating systems that assists you to perform scanning of your photos and documents quickly. It supports an uninterrupted scanning of your data with just a few clicks of your mouse. In addition, canon IJ Scan Utility comes packed with interactive features to ease your scanning for an unmatched experience.
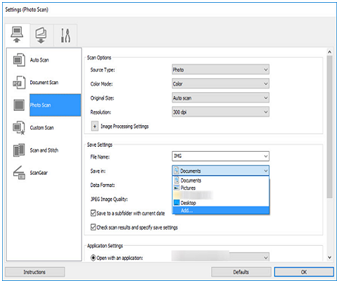
It is available for you to perform actions as per the available options on your screen. Canon IJ Scan Utility has three different modes of scanning: Auto Mode, Document Mode, and Photo Mode. If you want to scan any of your items using the default settings, you can preferably select the Auto Mode. Meanwhile, choosing to operate in Document Mode, you ensure the improved readability of your documents as a result of scanning the document. Similarly, in Photo Mode, you can get the best quality of your photos scanned.
Also, on scanning your documents or images using the IJ scan utility, the scanned documents get automatically saved on your system’s Preset Folder. It’s until you make changes to the settings according to your requirements.
Your scanned documents may be used for certain other purposes in other apps and software such as emails, PowerPoint presentations and so on. The ij scan utility offers you to incorporate with such third-party applications and software by exporting your scanned items to the required service.
IJ Scan Utility Setup Installation
You can install IJ Scan Utility either using a CD you get along with the purchased package of your Canon IJ printer or scanner or via the official Canon support page on your web browser. Either way, you can easily and successfully get the setup installed on your system.
IJ Scan Utility Setup Installation using a CD
To install Canon IJ Scan Utility setup on your device using a CD, you can follow the given simple steps:
- Insert the provided CD into the CD drive on your system. You will see a setup dialog box appeared on your screen.
- Click on Setup, and then you will see the main program window displayed on your screen.
- Now, attach a USB cable to your PC and your Canon printer/scanner to establish a connection between both devices.
- In the case of a wireless printer, you can preferably establish a wireless connection.
- There appears a list of software. Now tick-mark the MP drivers checkbox, which includes the Canon IJ Scan Utility software.
- Now, in the license agreement window appearing on your screen, click on Yes to give your consent.
- The IJ Scan Utility setup installation thus begins. Once done, click on Finish to complete the installation.
IJ Scan Utility Setup Installation via the website
To install Canon IJ Scan Utility setup on your device via the website, you can follow the given simple steps:
1. Open your preferred web browser on your system and insert the URL usa.canon.com/support in the address field. The Canon support page opens up on your screen.

2. Now, enter your Canon printer/scanner model name or number in the required space. In case you don’t remember your model number, you can consider checking the label at the rear of the device.
3. Once you begin to type your device’s name, you will see a list of devices below. Now, select your device’s name from the list.
4. Now, to begin the installation process, you need to click on the Drivers & Downloads tab. The IJ Scan Utility software is available as built-in software in the MP drivers package.
5. Now, check for the selected operating system in the Drivers & Downloads section. If you are attempting the installation on Windows, select the appropriate Windows version. In the case of Mac, select Mac.
6. Click on the Select button and then on the Download tab to proceed. This will begin the downloading of the setup for your system.
7. Now, to begin with, the installation of the software, double-click on the recently downloaded file. This will open up the main screen of the program.
8. Now, ensure establishing a connection between your PC and printer/scanner, and then select the MP drivers checkbox. This will begin the installation of setup on your PC.
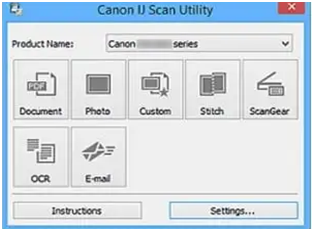
Launching the main configuration page of Canon IJ Scan Utility on Windows
In order to launch the main configuration page of IJ Scan Utility on your Windows PC, you need to follow the few simple steps given below:
- Go to the Start menu on your computer, or you can directly press the Windows key on your keyboard to open the Start menu.
- In the search bar, type Canon Utilities. The Canon Utilities will be visible to you.
- Now, click on the down arrow key beside the folder name “Canon Utilities.”
- You will be able to see all the utility software already installed with the driver package.
- Here, click on Ij Scan Utility. The main window will appear with numerous options such as Scan, Document, Photo, OCR, Email, etc.
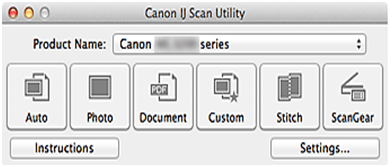
Launching the main configuration page of Canon IJ Scan Utility on Mac
In order to launch the main configuration page of IJ Scan Utility on your Mac PC, you need to follow the few simple steps given below:
- Firstly, click on the Go button available on the top of your desktop screen.
- You will see a list with all the possible options that appear on the screen.
- Click to select the Applications folder. You will see all the installed apps appeared on your screen.
- Now, check for the “Canon Utilities” folder in the list of applications appearing on your screen. Click to select the folder once you find it.
- Lastly, click to select IJ Scan Utility. To proceed further, you can select Canon Scan Utility Lite. By this method, you will be able to launch the software’s main interface with all the available options you can use to perform scanning.