Download Canon PIXMA MX492 Driver From Ij.start.canon
One can use Canon MX492 Setup CD or online drivers to install the Canon printer. However, the online drivers will always be updated one.
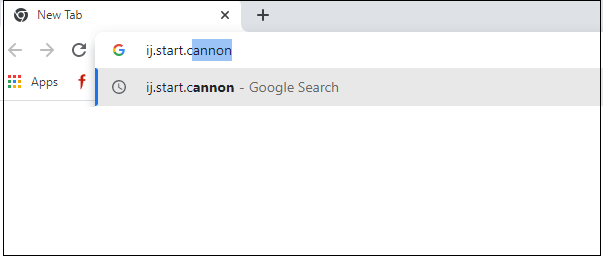
- First of all, open a web browser and enter “Ij.start.canon” (or canon.com/ijsetup) in the search address bar. Press Enter key to open next.
- Click on Set Up (Start Here) tab on the welcome page.

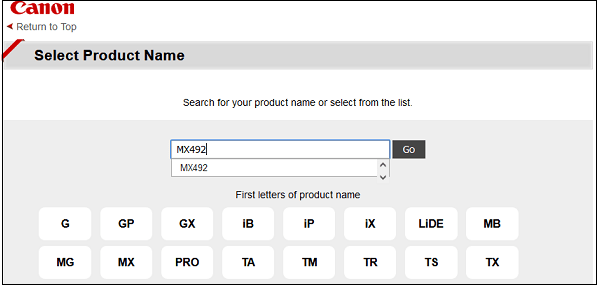
- Now, follow any of the two options. Either type the MX492 on the shown box, select the product and click Go. Otherwise, click on “MX” and select MX492 from the given series.
- You are on the Canon PIXMA MX492 Driver download page, here click on the “Download” tab.
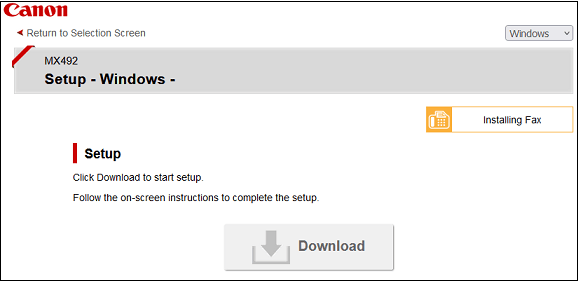
- Once Canon ij setup is downloaded, run the software and follow instructions to install it.
Canon PIXMA MX492 Connect to WiFi
Before you start Canon MX492 wireless setup installation, connecting the WiFi/ wireless network to your printer is essential. Here’s how to do it;
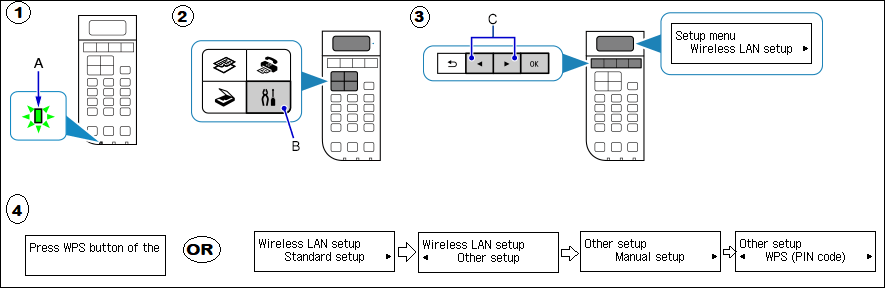
Step 1: Turn on your MX492 printer. The initial screen should be “Copy 100% Letter.”
Step 2: Press the Setup (screwdriver) button.
Step 3: Select “Wireless LAN setup” and press OK using the left or right key.
Step 4: Depending on your router type, the MX492 searches the network, then chooses an option accordingly.
- WPS Push Button: If your router is wireless, select the WPS push button on the printer screen and press the WPS button on the router. Once all the lights stop blinking, the network should be connected.
- Other Method: you can also select different methods, like WPS, WPS PIN code or Cableless setup. In these methods, select preferred options and enter the WiFi password to connect the router network to the printer.
Step 5: If the connection fails, press the Stop button and retry the process. Once you see the “Connected” message, the Canon MX492 wireless setup with WiFi is done.
Canon MX492 Setup for Windows
- Start the initial screen with the Copy button.
The printer should be on. If not, switch on the power and press the ON button. Then, press the Copy button on the LCD menu.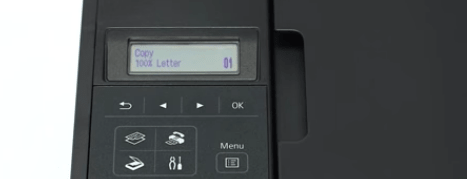
2. Establish the wireless network setup.
Press the setup button and press OK. Once Standard Setup appears, use the right key to open WPS (Push button). Then, press and hold the WPS button on your router and wait for the MX492 display to show a connected message.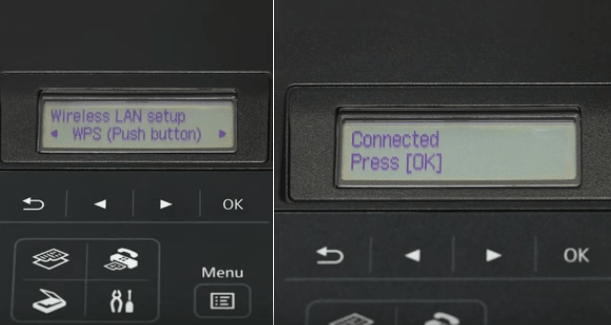
3. Install CD or download online Canon printer MX492 driver.
If you don’t want to go online, insert the shipped windows CD and install it. Otherwise, visit canon.com/ijsetup or ij.start.cannon and provide the MX492 model. Then, select Windows OS from the top right and download the latest drivers and software.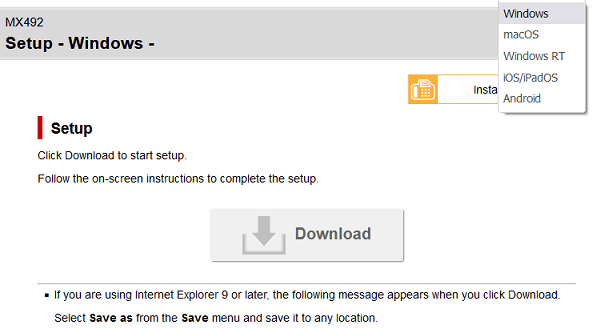
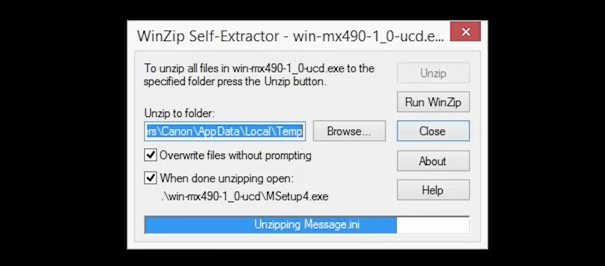
4. Run the win-mx490-1_1-mcd.exe installer file.
On Windows, you may see another prompt, hence choose to save the printer setup. Then, click Run or double-click on the win-mx490-1_1-mcd.exe setup file.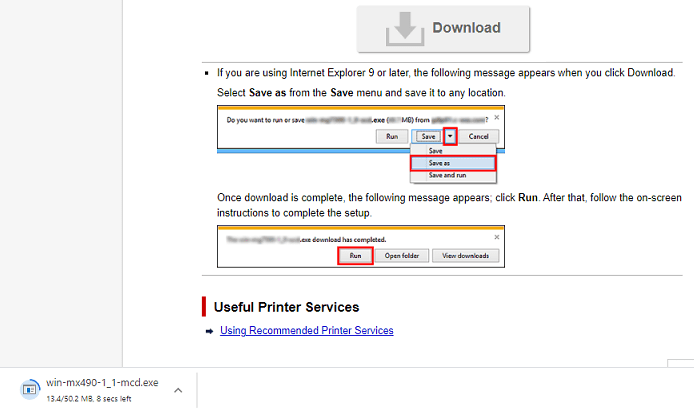
5. Click next to acquire information.
The file will extract itself, and you’ll jump to the first installation screen. Here, click Next and wait for your Windows PC to acquire the information.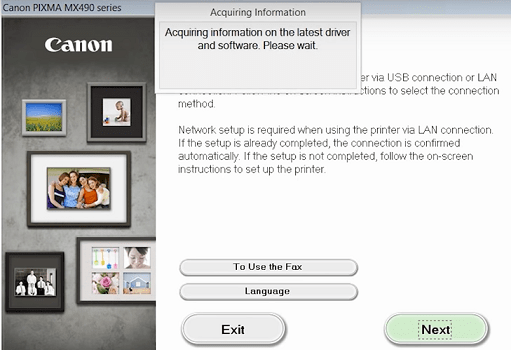
6. Select Wireless connection type.
The printer search for network and two connection type appears on the screen. Select Wireless LAN connection and click Next. Make sure your select “connect via wireless router” and click next. 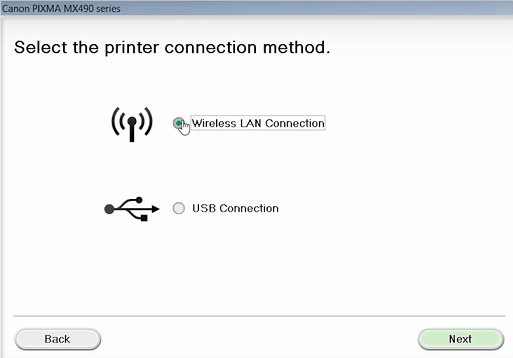
7. Select your mx490 serial number from the network list.
Click Next and wait for your printer to show in the list. If it fails, check on the “Setting printer could not be found on the list” box, your mx490 serial number will be listed quickly. Now select it and click Next. 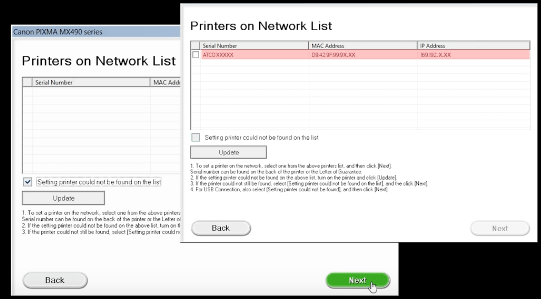
8. Select the Push button method and complete the connection.
In the setup procedure selection window, click Push Button Method. Then, click Next on the following two screens and select your mx490 printer and complete the setup.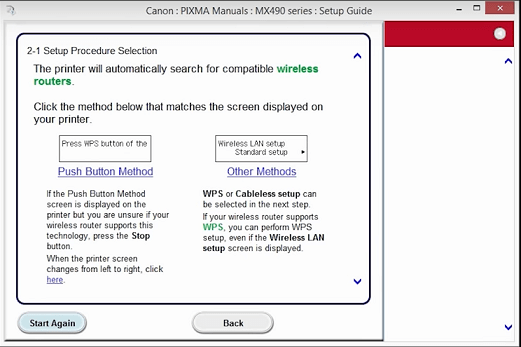
9. Select Software list and accept license terms.
The Canon PIXMA software list appears on the installation screen, hence mark on the software you required for MX492 and install. Then, click Yes on the software license agreement to accept terms. 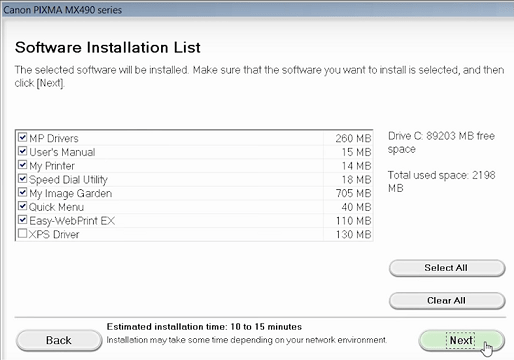
10. Follow the on-screen prompts to complete the PIXMA MX492 Setup.
Once you accept the license terms, click Next to allow all installation wizards. The setup starts installing drivers, and click “Complete” to finish the process. Next, load the papers in the printer and try the first printing.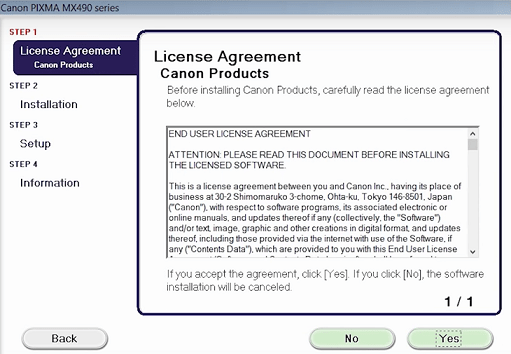
Canon MX492 Printer Setup on Mac
- Configure the initial screen.
First of all, turn on your MX492 and press the Copy in the menu button. Now, press the screwdriver (setup) to open Setup Mode and tap OK. 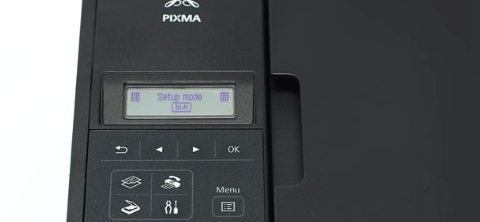
2. Perform Wireless Standard Setup Process.
LCD shows Standard Setup, press OK. Then, select your network access point and provide the password. Once you see “Connected” status, then press OK to finish the wireless setup. 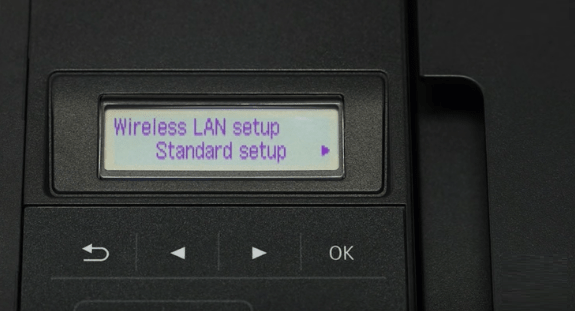
3. Visit canon.com/ijsetup to download drivers.
Enter the canon.com/ijsetup on the Safari browser. Once you jump next, click “Setup” and enter the model name “MX492” on the following webpage. Select “macOS” 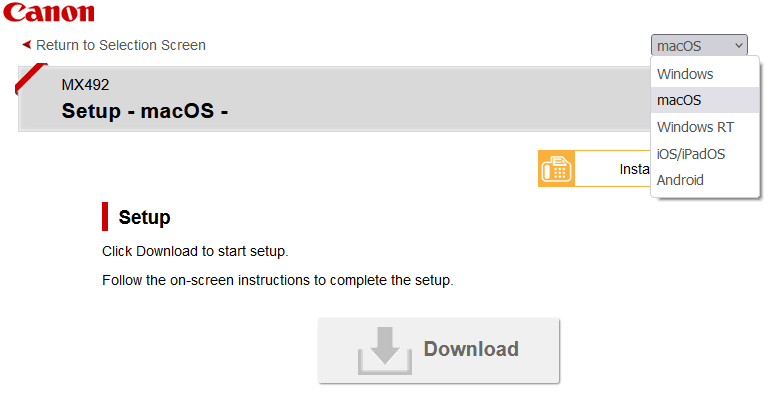
4. Open the Canon MX492 printer install file.
Click on the “mac-mx490-1_1-mcd-2.dmg” file to open it. You may require to double-click on setup to start the installation. 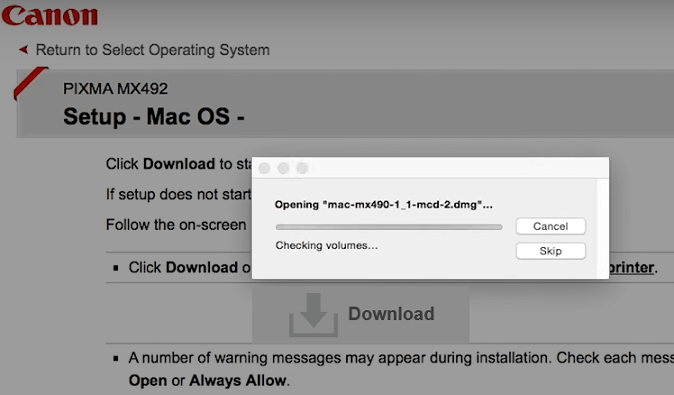
5. Enter your device username and password to allow installation.
Once you click Open, it acquires Canon PIXMA MX492 driver information, then clicks next. Now, provide mac admin username and password and select “Install Helper” to continue. 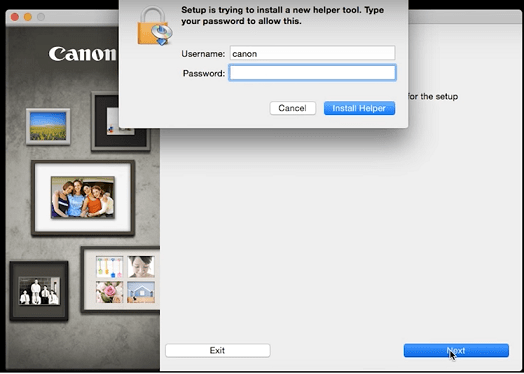
6. Continue with wireless connection installation.
You have to select “Wireless connection” and click next. Then, choose recommended option in the wireless LAN method screen. Click next and keep your printer turned on. 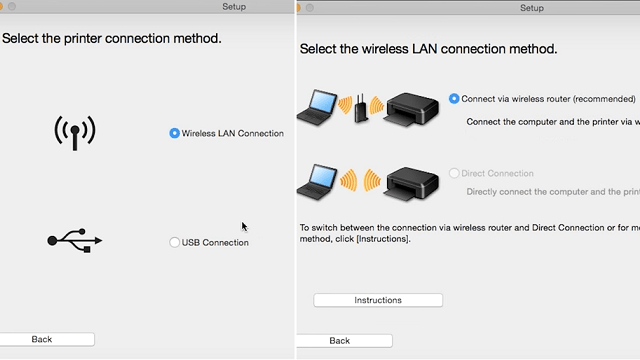
7. Select your printer and install all drivers and software.
You’ll see your MX492 serial number on the network list; select it to continue. If it appears, select your place, then tick on the drivers or select all from the software list to continue the installation. 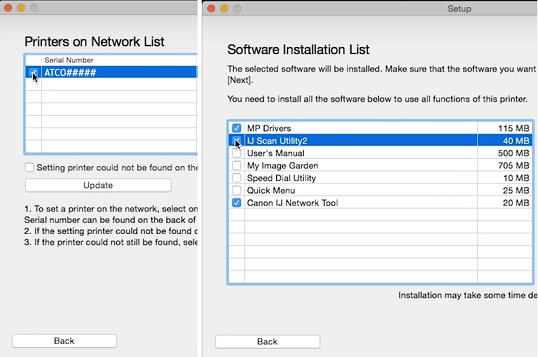
8. Click Yes on the license agreement and create a manual for the desktop.
Review License Agreement and click Yes to accept it. In the next window, you can create a manual on the desktop by selecting the “Agree” button, and it’ll quickly begin Canon MX492 setup files installation. 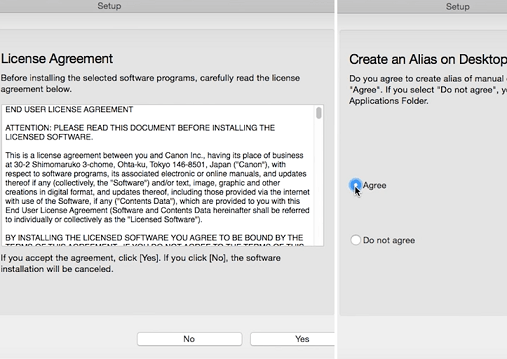
9. Add your MX492 printer to macOS.
Once the file installation is completed, click on “Add Printer” and select MX490 series from shown list. Now, click Add button and wait to set up MX492, then click Next. 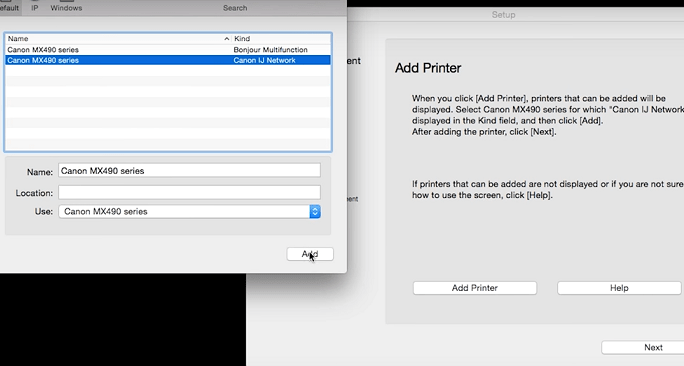
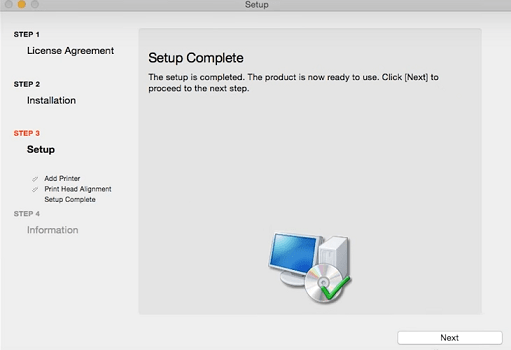
10. Finish the Canon printer MX492 setup.
Click “Execute” in Print Head Alignment and load paper on the Canon printer simultaneously. If the paper prints successfully, click next in Setup Complete window.